


, 3-Port Fast Compact Wall Charger for MacBook Pro/Air, Google Pixelbook, ThinkPad, Dell XPS, iPad Pro, Galaxy S22/S20, iPhone 13/Pro, and More")


Spark AR Tutorial: Through Spark AR Studio Develop Blinking Game Development – Part 1
Hi Spark AR Beginners, in this tutorial today we will learn how to make an Instagram game using Spark AR Studio. This is a game filter for Instagram that works well with Spark AR’s latest version (v101 to current version) with a new API.
In this tutorial, I focus on providing you with a template that is very little affected by the script. You don’t need to know a lot of scripts to execute, and of course, you can also use this script file for other game projects.
About the concept, we will have two main scenes, the gameplay, and the game over. If the game ends and the player wants to play the game again then players will tap on the screen to get started.
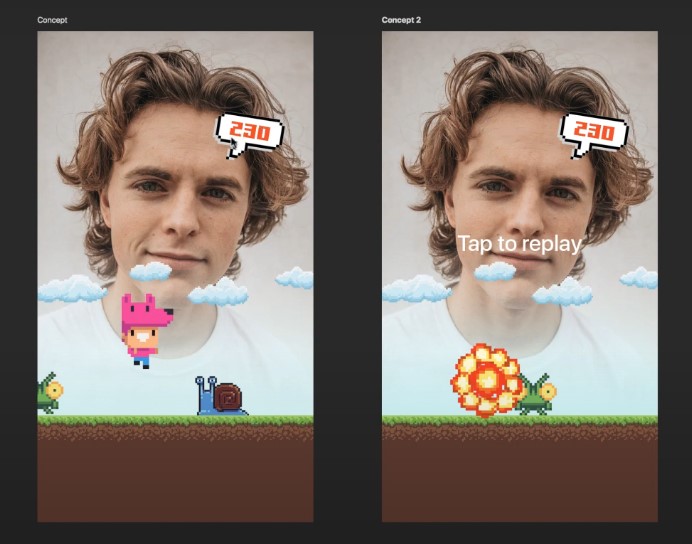
The collider will run from right to left and faster up. Players will have to blink to overcome the obstacles every time player pass a collider will get an extra one point when colliding with obstacles.
Game over when collided, the player will explode and the game will stop. Players need to tap the screen to play again, as usual.
I have also prepared for you a design file with the assets needed during practice. You can download and use it for this project.
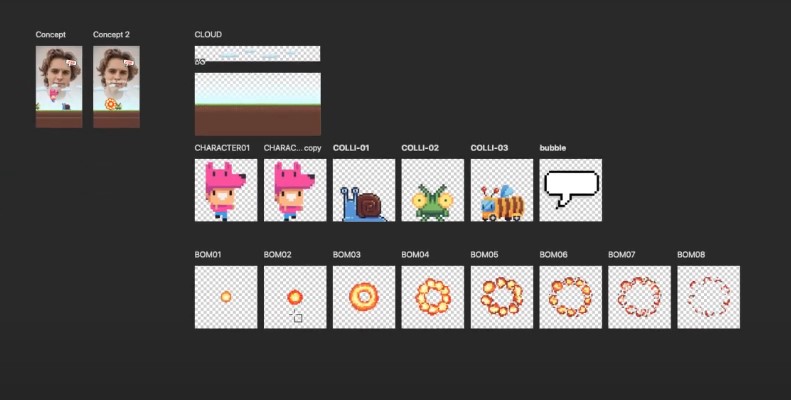
Ok, take a look at what’s in this file. I will have background and cloud, Cool. It will run from right to left characters. We will use animation sequences with two images to describe the running action colliders. We will have three images with animation sequences type also. Images will be randomly shown in the scene bubble to show the score inside and follow the user’s head bomb effect. We have eight images depicting the explosion effect when the character collided that’s all.
Now, all we need to do is export all these images as PNG files. I will create a new folder as assets and save them there. Perfect, for projects that use images like this filter, remember to compress it first, then click on the resource link that I have provided.
Then click Tiny PNG. Select all the images you have just exported drag and drop them into tiny PNG to compress them wait for the process to complete. After compressing download the file and extract the folder.
You will have all the images already compressed. I will copy it to my working directory. Create a new folder and name, add compression. Paste all images inside this folder. Import assets to Spark Air Studio, create a new project on Spark AR Studio. Select non-sequence images.
Then drag and drop it into the assets panel first, we have cloud background, and bubble. And don’t forget to turn on “no compression” for them, Cool.
Now, we will create a list of animation sequences. Click add assets and animation sequence. The first is character. Create a new image texture. Click the compression folder and select two images of the characters, Great.
Next are colliders, Let’s do the same thing. Create a new image texture, then choose three images for the Colliders. And finally, the bomb effect, Perfect. In the next step, we will create a material list that corresponds to the texture list we have below. Click Add assets, then select material. We will create materials in the order of the textures to avoid missing. The first is cloud material. Change the shader type to flat. Then select the cloud texture. Duplicating the material to create the background this way will save your time because, you know, need to change shader types when creating new material.
Choose the background texture. Do the same thing until we have all the materials that correspond to all the textures. Now you have all the assets ready to use. Build your filter. First out of face tracker object to detect your face, make it smoother by adding a face mesh inside and name it skim.
Create a new material. Then change the shader type to retouching. Now, change the View mode to back, make it easier to work. At a null object, I usually use null objects to easily change them later. Name a gambler or whatever you want. Next, create the background. I will use a plain object instead of a rectangle object. Because I don’t want my objects to change the position or break my logic. When you use different devices with different sizes, create material by click the plus button and choose background material.
Then I will edit the background-size by changing the scale value because the plain object is a 3D model, but we work with 2D. So keep in mind, is the Z value? Allawi is one change the position by dragging the y axis. It’s a green arrow. However, remember to revise the position value to a rounded number for easy management. Please check with some different devices. See, it works well or not. I will try with iPhone AC with a small screen iPhone X. He’s indicted with a big screen.
Nice. It works well. I will change a little bit to make it beautiful and right race. I will change the height by changing the scale value. Whenever you change the position or scale, double-check with another device to make sure your visuals are displayed well on all devices. Ok, nice.
Create one more plain object to add the character. Please make sure all plain is inside the null object we call gameplay. Add character material. Let’s change the position to make it display, fit your scene. Change the scale value to make it a trite ratio. Remember to round numbers because this value will affect the outcome of the collision.
Perfect, You can make the animation run faster or slower by changing the face value. I will set the FPSO 10. Now create the collider, I will duplicate the character to make the collider. This way will save more setting time. Change the position and then change material to Collider.
Now we add the other plane object to make the cloud. That should the same with like background. Add the cloud material. Resize it to match the proportions. I’ll reduce the height by half. Remember to name it.
Now we will arrange the order of the objects in the scene panel. Cool. If you don’t want to see the collider, always change. Select Collider Animation and uncheck in the loop. Perfect.
Remember, this game filter for Instagram works well with Spark AR’s latest version v85 to the current version with a new API.
Updated V90:
Fixed a bug: the score always increased whenever the character jumped.
Add instruction at the beginning
In this template, you will get a lot of great things:
- 90% is a patch editor but use very few patches because I take advantage of the power of v101+
- Script file works with new technology from Spark AR studio (new API) and is easy to reuse for other games
- The theme set with a lot of accompanying items will help you can use as you like
You can choose the background and character you like for your game
Easy choose and replace collision object
With a new method, you just use a few patches for your project
Spark AR Tutorial: Blinking Game Filter v85+ [Part 1]
Try it and download free assets for practice
Try it Instagram: https://www.instagram.com/ar/274614876997356
Download free Blinking assets for practice: https://shmilon.com/BlinkingGameAssets
Download Blinking Patch: https://shmilon.com/BlinkingGamePatch
A lot of Cool AR games filter:
Happy Birthday: https://gum.co/wONN
Blinking game: https://gum.co/PTRn
Flappy Bird: https://gum.co/TSKlx
Delivery Man: https://gum.co/GKarJ
If you like my product, please RATING 5 STAR ⭐️⭐️⭐️⭐️⭐️ to help more people know it!

")
")


