How to Install WordPress using Fantastico
Fantastico is a common auto-installer script used by some WordPress hosting providers. It is similar to the other installer scripts in the list and offers an easy way to quickly install WordPress.
First, you need to login to your cPanel dashboard. Scroll down to the software and services section, and there you will find the Fantastico icon.
Clicking on Fantastico icon will launch the auto-installer script.
Some hosting providers are still using an older version of Fantastico. In this tutorial, we will be showing you screenshots from Fantastico F3 version. If Fantastico on your host looks different, then don’t worry. Basic installation steps are the same, and you should be able to easily follow them.
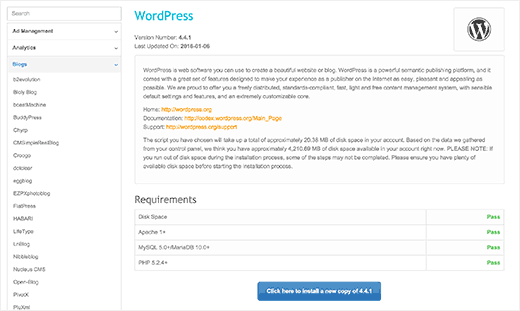
On the main Fantastico screen, you will see a list of web applications on your left. You need to click on Blogs, and there you will find WordPress listed among many other applications.
Clicking on WordPress will show you an overview of the application with an Install button.

Simply click on the ‘Click here to install WordPress’ button to continue.
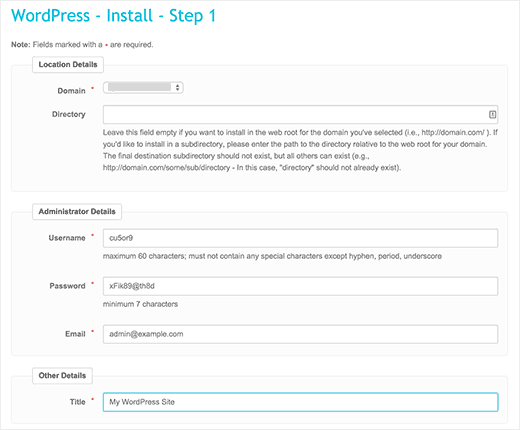
Fantastico auto-installer for WordPress will now ask you to fill in your installation settings. First, you need to choose the domain where you want to install WordPress.

If you want to install WordPress in a sub-directory then you can enter the sub-directory name in the field below. Otherwise, make sure that this field is empty.
Under the Administrator Details section, you need to provide admin user account information. Enter a username, password, and email address for your WordPress admin account.
Click on the Submit button to continue.
Fantastico will now install WordPress for you. You will be able to see the installation progress. Once it has finished installing WordPress you will see a success message.

