Complete Guide How to Install ClockworkMod Recovery
Here is what shall be covered in this guide:
- About Android recovery
- Introduction to ClockworkMod
- Installing ClockworkMod
- Booting into ClockworkMod
- Feature tour
About Android Recovery
Introduction To ClockworkMod
Installing ClockworkMod
For those, the method you should follow in order to install ClockworkMod recovery is described in both my MT65x3 and MT6516 flashing tutorials:
- MT65x3 flashing tutorial
- MT6516 flashing tutorial (instructions for flashing recovery are right in the end of the tutorial)
Please note that those are just generic flashing tutorials. You need to find the ClockworkMod recovery image specifically designed for your device.
Booting Into ClockworkMod
Once you have ClockworkMod recovery installed on your Android device, booting into it is quite simple:
- Using a hardware button combination on most Android devices:
On most Android devices including ones by HTC, you can enter recovery by powering your device off and then powering it back on while keeping either the ‘Volume-Down’ or the ‘Volume-Up’ button pressed, depending on the device. This will enter the bootloader from where you can select the ‘RECOVERY’ option by navigating to it with the Volume key and entering it with the ‘Power’ key.
On MediaTek chipset based devices, such as G11i Pro, the method is the same as above, except that in this case the device will to boot directly into recovery mode. In very rare cases, the device needs to be connected to the computer via the normal USB data cable.
On most Samsung devices, specifically Samsung Galaxy S series devices, you must keep both the ‘Volume-Up’ and ‘Home’ keys pressed while powering on the device, to directly enter recovery.
- Using ADB (for advanced users):
If you have ADB installed on your computer, you can simply enable USB debugging mode on your device from Settings > Applications > Development, connect it to your computer via USB, launch a Command Prompt / Terminal window on your computer and enter this command:
Adb reboot recovery
- Using the extended power menu on your Android device:
This is another way of booting into recovery, but please note that the extended power menu is only present on some custom ROMs.

Feature Tour

- This one is self-explanatory.
2 – apply update from sd card This can be used for installation of any official or unofficial update, ROM, kernel, theme etc. that is in a zip format installable from recovery, as long as the file is named update.zip and it has been placed on the root of your SD card (i.e. not in any sub-folder). Selecting this option (and most of the options featured below) will bring up the following confirmation prompt (which you may find annoying but can avoid problems caused by accidental key presses):

- This option wipes all user data on the device as well as cache. Doing this will leave your phone in the state it was in when you bought it or when any custom ROM was first installed. It will also wipe any sd-ext partition that you might have setup (more on this later).
4 – wipe cache partition
- Wipes the cache partition of the device to clear all the data accumulated there overuse. This is often used before installing a new ROM, app, kernel or any similar mod via recovery.
5 – install zip from sd card
- This option brings up the following sub-menu:

5.1 – apply /sdcard/update.zip
This one is essentially the same as the
apply update from sdcard
option of the main menu.
5.2 – choose zip from sdcard
Lets you install any zip file (with any name) from any location on your SD card. The file can be for a ROM, a kernel, an application, a theme or any mod as long as it is in recovery-flashable zip format. This is the most widely used option for installing a ROM that you have downloaded and copied to your SD card. Entering this option will bring up a screen that will allow you to browse your SD card for the zip file and select it for installation as in this screenshot:

5.3 – toggle signature verification
Turns the signature verification on and off. When signature verification is on, you will not be able to install any custom ROMs that haven’t been signed by the developers (most custom ROMs aren’t signed). Switching it off skips the signature verification check and proceeds with the installation.
5.4 – toggle script asserts
Seldom-used option for a vast majority of users. It simply turns script asserts on or off. If you don’t know about these, it’s best not to change this option.
5.5 – +++++Go Back+++++
Takes you back to the main recovery menu, obviously!
6 – backup and restore
- This is without any doubt one of the most important features provided by a custom recovery, the backup and restore feature – also known as Nandroid backup – allows you to take a snapshot of your phone’s entire internal memory including all partitions, and save it on the SD card. Here is how it looks:

6.1 – Backup
Takes a Nandroid backup, as explained above.
6.2 – Restore
Lets you restore a previously taken backup. Entering this option presents you with a list of existing backups from the SD card that you can choose from for restoration.
6.3 – Advanced Restore
This option is similar to the
Restore
option but once a backup has been selected to be restored, this option allows you to choose what parts of it to restore. You can choose to restore the boot, system, data, cache and sd-ext partitions, as shown here:

- Allows you to perform maintenance tasks on all the internal and external partitions of your android device:

7.1 – mount/unmount /system, /data, /cache, /sdcard or /sd-ext
These options let you toggle between mounting or unmounting these respective partitions. Most users don’t need to change these options.
7.2 – format boot, system, data, cache, sdcard or sd-ext
These let you directly format any of these partitions. Take extreme care with this option as formatting any of these partitions will result in losing all data on them, especially the boot and system partitions. Formatting the system partition will remove your ROM and leave your phone without an operating system while wiping the boot partition may brick your phone unless you restore or flash another one before rebooting your device. To learn more about the contents of all these partitions, see our guide to Android partitions.
7.3 – mount USB storage
Lets you enable USB mass storage mode for your SD card right from recovery so that you can connect it to your computer via USB and transfer any files to/from it without having to leave recovery.
8 – advanced
- This section contains a few options most users will not require, though these can come handy quite often, especially wiping Dalvik cache, which is required before most ROM installations. Here are the options from this section:
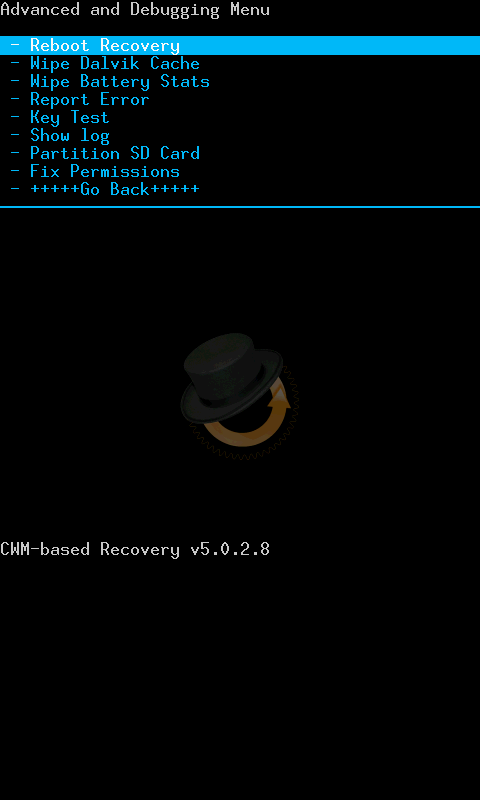
8.1 – Reboot Recovery
Lets you directly and very conveniently reboot from recovery right back into recovery. This is useful option for certain back-to-back installations that require the device to at least boot once between them.
8.2 – Wipe Dalvik Cache
Allows you to wipe the cache for the Dalvik virtual machine (the custom-built Java virtual machine for Android).This is required before most ROM installations and at other occasions too, for fixing some problems.
8.3 – Wipe Battery Stats
Wipes the saved battery usage statistics and effectively recalibrates the battery. Useful in various scenarios when Android is not showing correct battery levels.
8.4 – Report Error
In case of errors, this feature can be used to save a log of recent ClockworkMod recovery operations on the SD card that you can later report from Android using ROM Manager.
8.5 – Key Test
Lets you press any of the hardware keys to see if they are properly functioning, and to see their key codes.
8.6 – Partition SD Card
This option gives you a no-frills way to partition your SD card properly for use with ROMs that support data2ext (a very handy hack for low internal memory devices that enables an /sd-ext partition on the SD card to be used as the internal user data storage i.e. as the /data partition). Once this option is selected, you will be given options to choose the sizes for the /sd-ext partition as well as an optional /swap partition on the SD card, and will then automatically format it for you, leaving the remaining space for normal SD card usage.
This option will wipe all data from your SD card so use it with caution!


8.7 – Fix Permissions
Fixes the file permissions for the internal memory partitions back to default. This is very useful as a fix for several errors and Force-Closes that start appearing after you or an application you installed and provided root access end up messing up the permissions of important files.
9 – power off
- Do I need to tell you what it does?